 Doodle
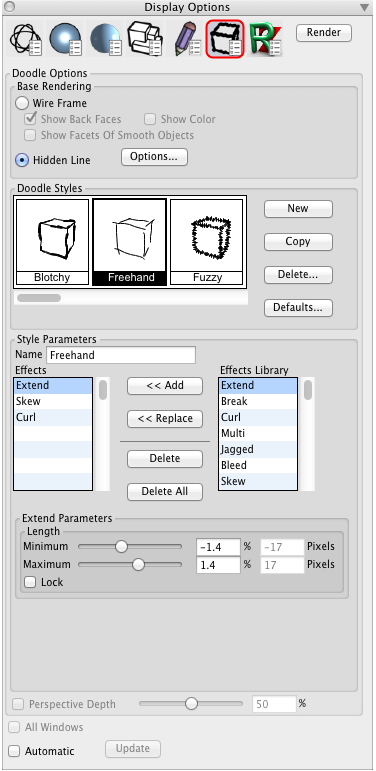
The Doodle Options Palette.
|
The Doodle display options were revised for bonzai3d 3.0. The display icons are shown at the top of the Display Options dialog. Clicking on these icons changes the the Display options below. |
Revised in v. 3.0 |
Selecting this item generates a “doodled” drawing in the active window. This style of display simulates many hand-drawn drawing styles. It is designed to produce an image with a softer or more natural quality. Options within the Doodle Options palette are as follows:
Base Rendering: This section determines the rendering type that is used as the starting point. A doodle style is applied to each line from the base rendering to create the doodle rendering.
Wire Frame: When selected, the base rendering is a wire frame rendering. Note that only a small subset of the original wire frame options are useful to doodle renderings.
Show Back Faces, Show Color: As for the Wire Frame Options palette.
Show Facets Of Smooth Objects: When on, the facets of smooth objects are shown. When off, which is the default, the iso lines of the smooth objects are shown. For doodle renderings the iso lines are shown at half of the intensity of the facets.
Hidden Line: When selected, the base rendering is a hidden line. This rendering is the same as the rendering produced by the Hidden Line* menu command. The Options... button invokes the Hidden Line Options.
Doodle Styles: This section contains the available styles that can be used for doodle renderings. Each style is shown as a small preview of a cube rendered with the respective style. One of the styles in the list is the current style. The current style is shown with a heavy black border. Clicking on a style makes it the current style. The current style is the one that is used for rendering in the project window. The parameters of the current style can be edited by setting options in the Style Parameters section.
New: Clicking on this button creates a new empty style and makes it the current style.
Copy: Clicking on this button creates a new style by copying the current style and makes it the current style.
Delete: Clicking on this button deletes the current style, which is a permanent deletion. Deleted styles will not show up even after restarting bonzai3d. The style adjacent to the deleted style becomes the current style.
Defaults...: Clicking on this button restores all default doodle styles to their original default parameters. If any additional doodle styles have been created (with the New or Copy buttons) they can be optionally kept or deleted.
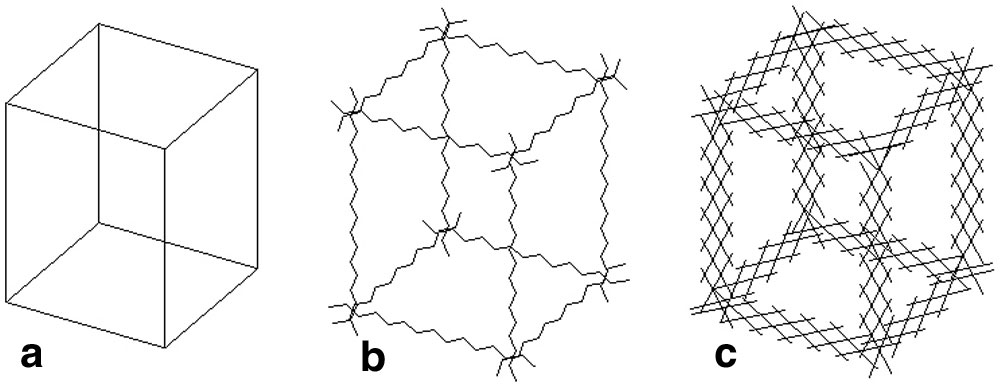
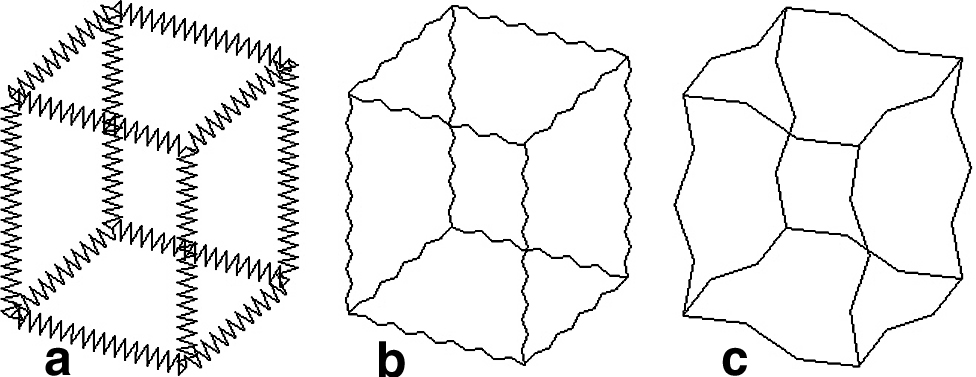
Effects ordering: (a) Wire frame cube (b) Extend and
then Jagged, (c) Jagged and then Extend.
Style Parameters: This section is used to edit the parameters of the current style. A style is composed of a set of effects. Each effect has its own parameters. The order of the effects is significant as the effects are applied sequentially and the result of one effect is the base for the next effect. When the order of the effects is changed, the resulting style is almost always different.
In the example shown, the Extend and Jagged effects are used in both images. In (b) the order is Extend and then Jagged, while in (c) the order is Jagged and then Extend.
Some effects create multiple lines (Break, Curl, Multi, Jagged, Bleed), while others only modify the source line (Extend, Skew). If an effect that creates multiple lines is applied, the next effect operates on each of the lines that resulted from the effect. A satisfying style can usually be created with just a few effects. A large number of effects for a single style tends to affect performance and to produce a confusing result.
Name: This is the name of the style. It must be unique.
Effects: This list shows the effects of the current style and the order in which they are applied (top to bottom). One of the effects in the list is highlighted to indicate that it is the current effect. Clicking on the name of an effect in the list makes it the current effect. Effects in the list can be reordered by clicking and dragging the current effect to the desired location in the list.
Effects Library: This list shows the library of effects that can be used in a style. One of the effects in the list is highlighted to indicate that it is the current library effect. Clicking on the name of an effect in the list makes it the current library effect.
Add: Clicking on this button adds the current library effect to the end of the Effects list and makes it the current effect.
Replace: Clicking on this button replaces the current effect with the current library effect.
Delete: Clicking on this button deletes the current effect from the Effects list.
Delete All: Clicking on this button deletes all the effects from the Effects list.
Preview: This image is a preview of the style. It is updated when the Effects list or a parameter of an effect is changed.
Effect Parameters
Under the lists and buttons is a section that displays the parameters of the current effect selected in the Effects list. Both the title and the content of this section change as a new current effect is selected. The non regular results of the doodle rendering are achieved by randomization of the parameter values. This is controlled by setting the minimum and maximum values for each parameter in the style. More variance will appear in the image when the minimum and maximum values are farther apart. Less variance will appear in the image when the minimum and maximum values are closer. The parameter values are specified as a percentage of the width of the image. This allows the doodle image to look the same regardless of the image resolution.
All effects use the following common parameters:
Minimum: This slider controls the minimum value for the parameter. The text field to the right specifies the percent of the image for the minimum value. The second text field indicates the number of pixels that this percentage yields for the active window.
Maximum: This slider controls the maximum value for the parameter. The text field to the right specifies the percent of the image for the maximum value. The second text field indicates the number of pixels that this percentage yields for the active window.
Lock: This check box locks the minimum and maximum values to each other which yields no variance of the parameter. When this is enabled, the minimum and maximum values change together.
Following are the parameters for each effect:
Extend Parameters

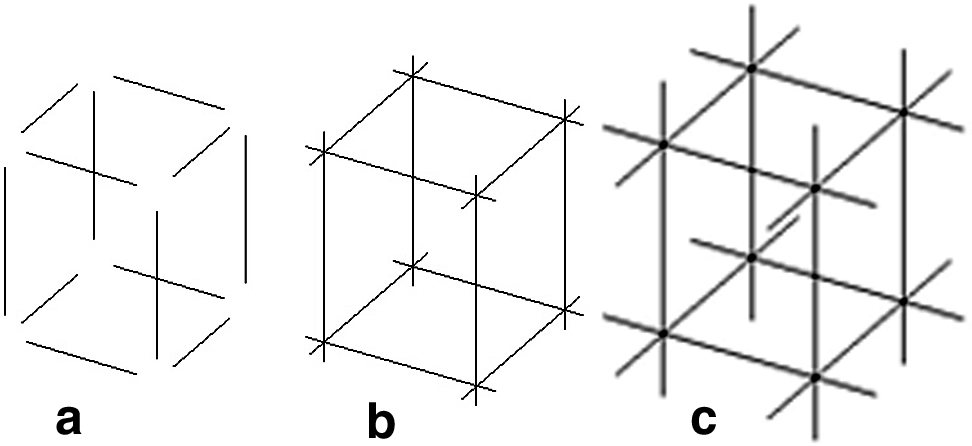
Extend effect: Length of (a) -3%, (b) 3% and (c) 10%.
This effect lengthens or shortens each line. It has a single parameter, as shown.
Length: The amount to lengthen (positive) or shorten (negative) each line.
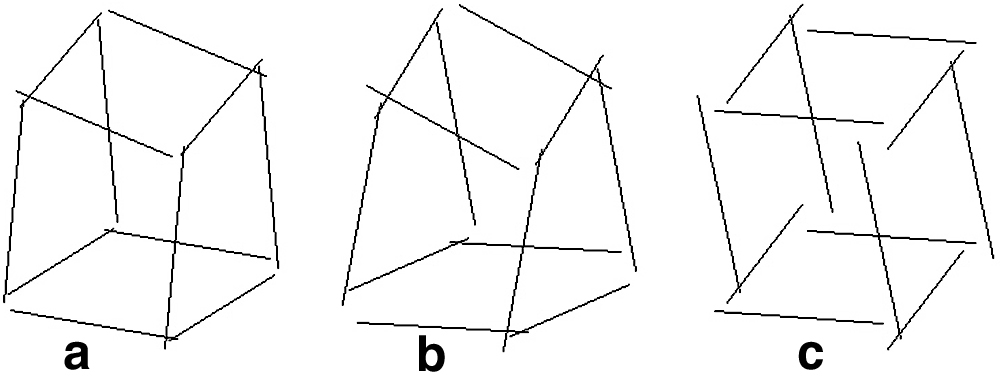
Break Parameters
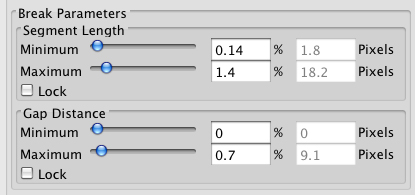
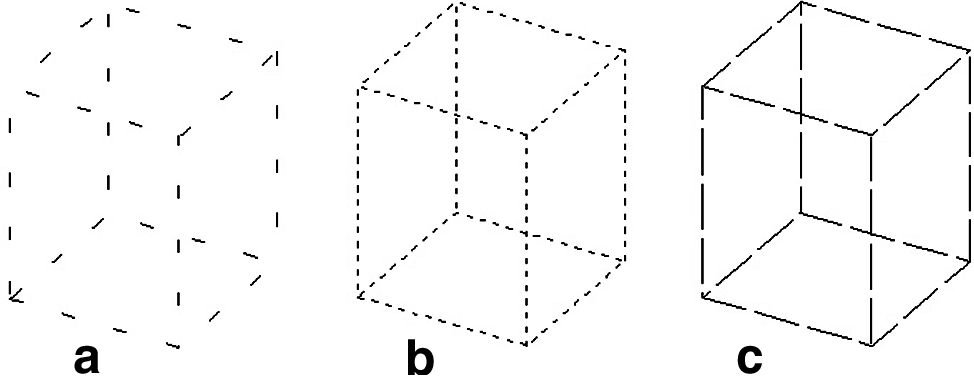
Break effect with Segment Length and Gap Distance of
(a) 0.8%, 1.3%; (b) 1.8%, 6.0%; and (c) 6.5%, 1.5%.
This effect breaks up each line into several colinear line segments for a dashed appearance, as shown.
Segment Length: The length of the solid part of each line segment.
Gap Distance: The distance of the gap between solid parts.
Curl Parameters
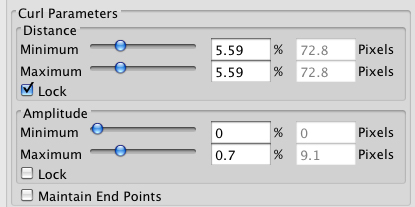
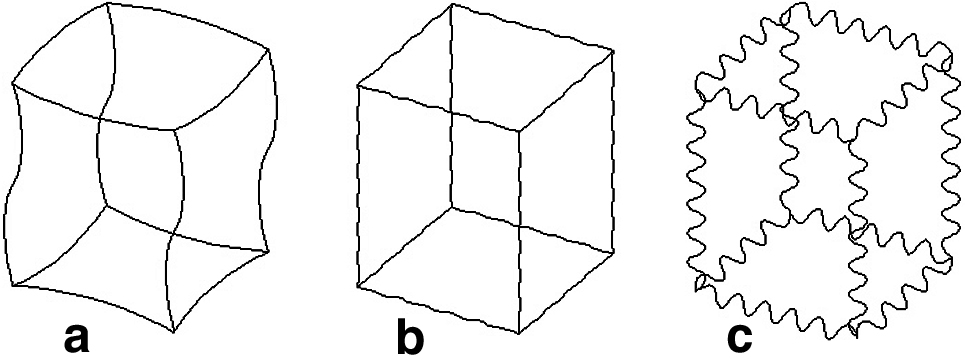
Curl effect with Distance and Amplitude of
(a) 14.5%, 1.3%; (b) 2.2%, 0.2%; and (c) 2.2%, 2.8%.
This effect curls each line, giving it a few or several curves. It actually creates several small straight segments. Thus, when combined with another effect, the other effect will operate on all of the small segments, which may yield unexpected results.
Distance: This controls the distance to a bend or curve of the line. Higher numbers yield smoother curves. Smaller numbers yield noisier and bumpier lines.
Amplitude: This parameter controls how high the waves of the curves reach.
Maintain End Points: If this option is on, each line’s end points are not moved from their original position. This allows an object to maintain its cohesive form by being connected at the corners.
Bleed Parameters

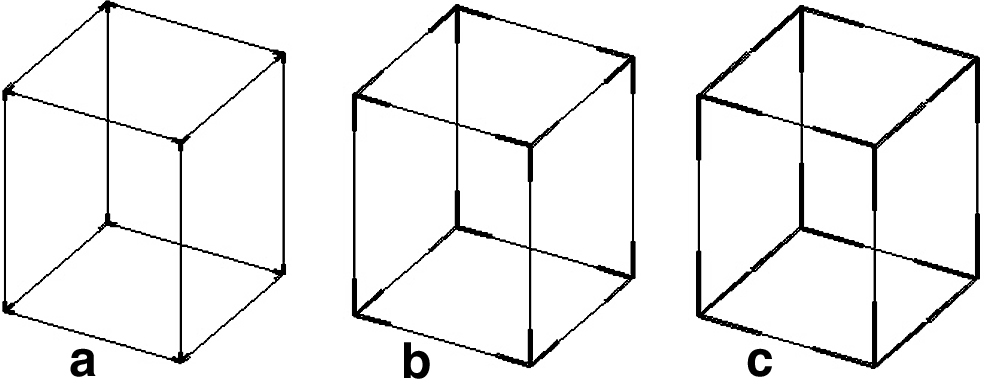
Bleed effect with Length of (a) 1.1%, (b) 5%, and (c) 9%.
This effect creates thicker lines at the end points of each line for a “bleeding pen” effect.
Length: The length of the bleed lines at each end of a line.
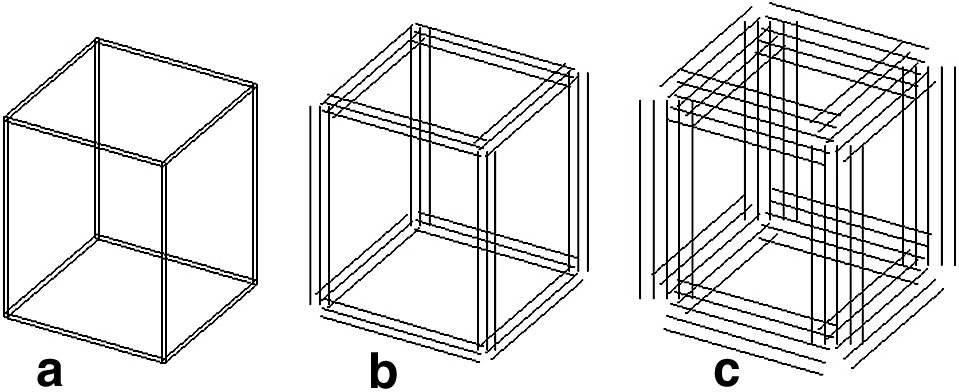
Multi Parameters
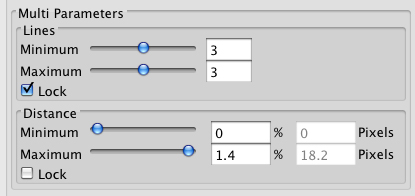
Multi effect with Lines and Distance of
(a) 2, 0.6%; (b) 3, 1.4%; and (c) 5, 2%.
This effect creates multiple lines for each original line and offsets them some distance from the original, as shown.
Lines: This is the number of new lines.
Distance: This is the distance by which the lines are offset from each other.
Jagged Parameters
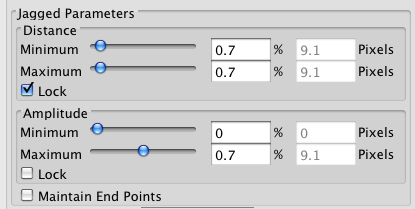
Jagged effect with Distance and Amplitude of
(a) 0.8%, 1.4%; (b) 2.2%, 0.2%; and (c) 8.7%, 1.4%.
This effect creates a jagged or zigzag line from each original line, as shown.
Distance: This is the distance between “jags” (changes in direction). It is calculated along the original input line. Higher values yield less and smaller yield more jagged lines.
Amplitude: This parameters controls the height of the jagginess.
Maintain End Points: If this option is on, the end points of the lines are not moved from their original position. This allows an object to maintain its cohesive form by being connected at the corners.
Skew Parameters
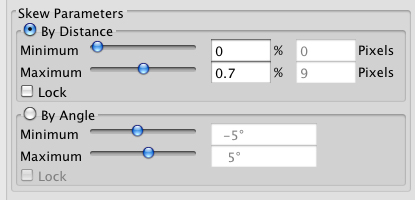
Skew effect with Distance of
(a) 1.4%, (b) 3%, and (c) Angle of 12%.
This effect twists or offsets each line by moving the end points or rotating the line.
By Distance: When this option is on, the values in its fields specify the distance to which the end points of each line are moved.
By Angle: When this option is on, the values in its fields determine the angle by which each line is rotated.
Perspective Depth: This option is only enabled when the current window contains a perspective view. When enabled, the parameters of the current style are adjusted relative to the depth of the lines in the scene. That is, the style parameters for each line are scaled down proportionally to the depth of the lines in the scene. The slider to the right determines the scale factor that is applied. The default is 50%. A value of 100% indicates no scaling and a value of 0% indicates the most scaling. An example of perspective depth is shown to the right. In this example the fuzzy style was used with the parameters locked which removes the randomness from the style and makes it easier to see the perspective depth effect.
All Windows: This option functions as with all other renderers with the same option.
